Host Control Panel
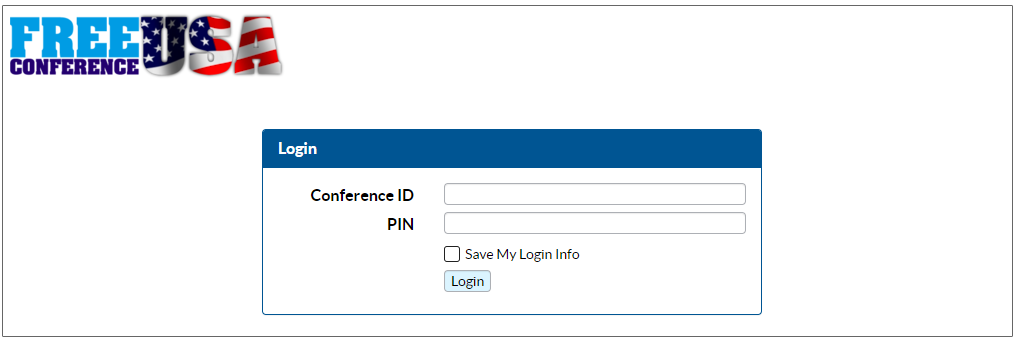
You can fully manage your account by logging into the Host Control Panel at panel.freeconferenceusa.com, or by clicking the Login link at FreeConferenceUSA.com. You will be prompted to enter your Conference ID and Host PIN.
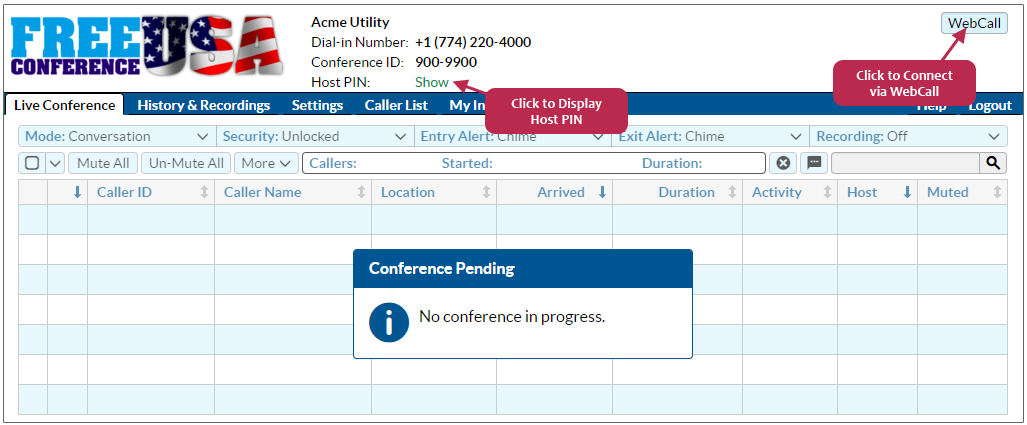
If there is no conference in progress, the following page will be displayed.
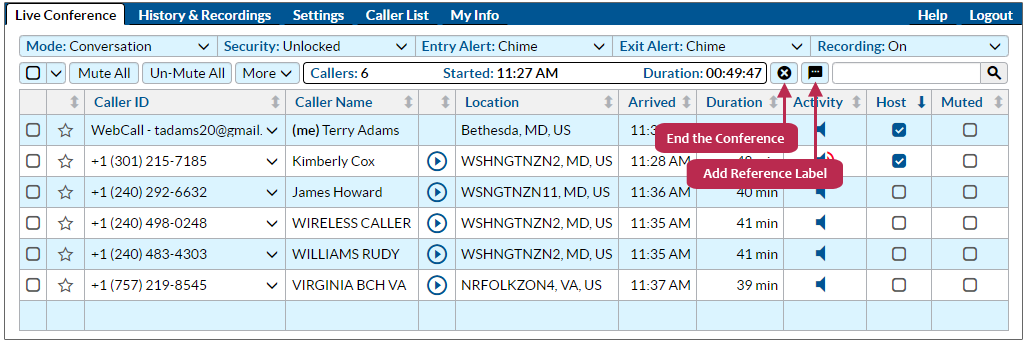
When there is at least one caller connected into the conference bridge, the Live Conference tab displays a caller list along with controls to change the conference setting and participant status.
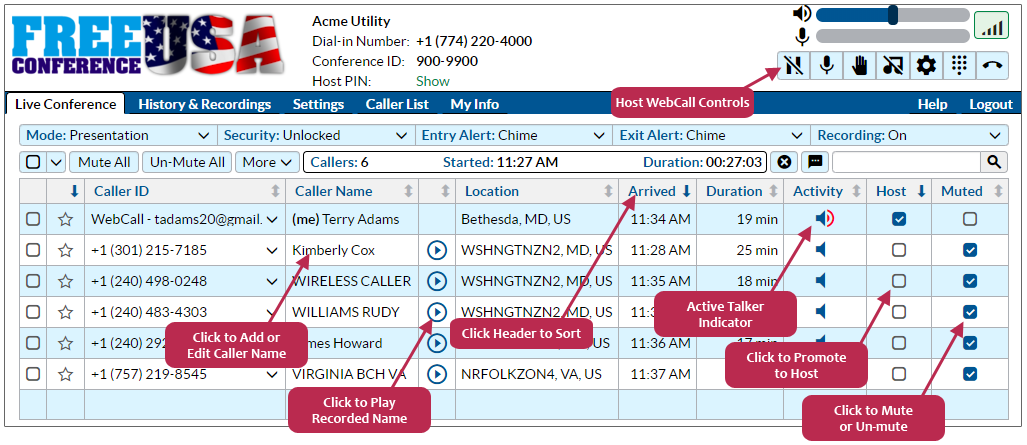
About Recorded Names. Clicking on the Play Name icon will play the caller's recorded name locally on your computer; the recording is not played into the live conference. This column does not appears if the Prompt Callers for Name default setting is off. If the setting is turned on, but the Play Name icon does not appear for a particular caller, this indicates that the caller did not respond to the prompt and no recorded name is available. The recorded name files are stored for 30 days, and can be accessed after the conference call from the Conference Details page in History & Recordings.
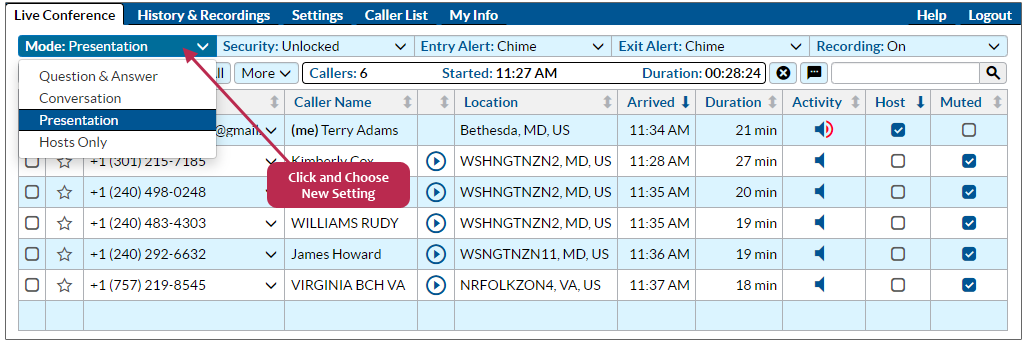
Modifying Active Conference Settings
All conference calls begin with the default feature settings, which can be modified via the Settings tab. The active settings are displayed in the top row. Clicking on a specific setting button triggers a drop-down selection box, allowing you to modify the setting for the active conference call.
Caller Action Menu
There are multiple options for changing the active status of callers in the conference. For example, you can click on an empty box in the Host column to promote that caller to a Host, or click on a box in the Muted column to mute or un-mute a particular caller. The full set of caller-specific actions can be accessed by clicking on the number displayed in the Caller ID column. A drop down menu will be displayed, as shown below. Click on one of the menu options to instantly change the caller status.
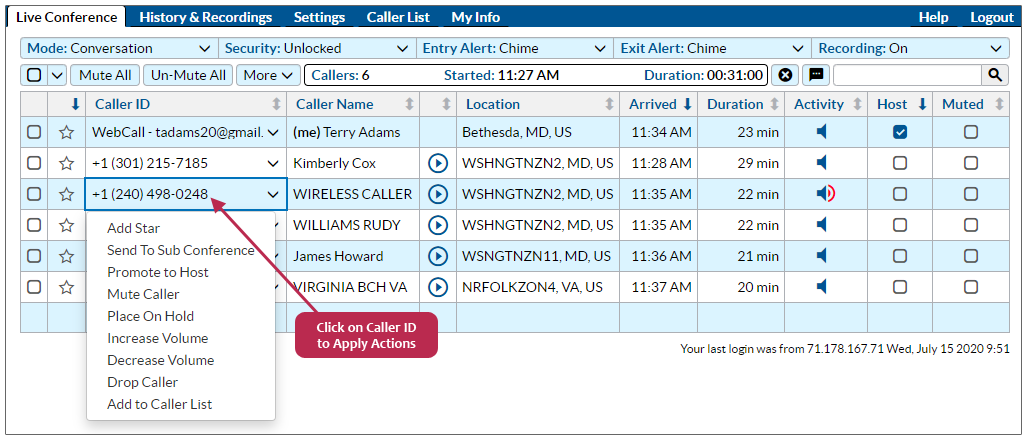
The options are described below:
- Add Star (Remove Star) – Same as clicking on a blank star icon in the second column.
- Send to Sub Conference Move caller to a sub conference. (Learn more at Using Breakout Rooms.)
- Promote to Host – Same as clicking on a blank box in the Host column.
- Mute Caller (Un-mute Caller) – Same as clicking on the box in the Muted column.
- Place on Hold (Take off Hold) – Temporarily removes the caller from the live conference, placing that caller on hold. A caller on hold cannot hear the conversation among the active callers in the live conference.
- Increase Volume – Increases the caller's speaking volume. You can repeat the action to further raise the volume. (This is comparable to that caller pressing the *86 Keypad Command.)
- Decrease Volume – Decreases the caller's speaking volume. You can repeat the action to further reduce the volume. (This is comparable to that caller pressing the *87 Keypad Command.)
- Drop Caller – Removes the caller from the conference call by terminating the caller's phone connection. If you select this option, you will get a pop-up box to confirm this action prior to the caller removal.
- Add to Caller List – Adds this caller to the stored list accessible via the Caller List tab.
Assign Caller Name
If the caller was not previously added to the Caller List, the Caller Name column displays the name information provided by the caller's phone company. Some mobile providers do not provide a name (the field may show “WIRELESS CALLER”), and name information is generally not available for callers outside the USA. Often, the caller name is displayed with the last name first (e.g., “SMITH SALLY”). You may assign or edit the name, which is stored in the Caller List. Stored names are linked to the Caller ID number. Note that many callers might share the same Caller ID if they are calling from an office location, or they are using services like Skype, so be careful assigning names in that situation. If the Caller ID is included in the Caller List, the Name column will display the stored name.
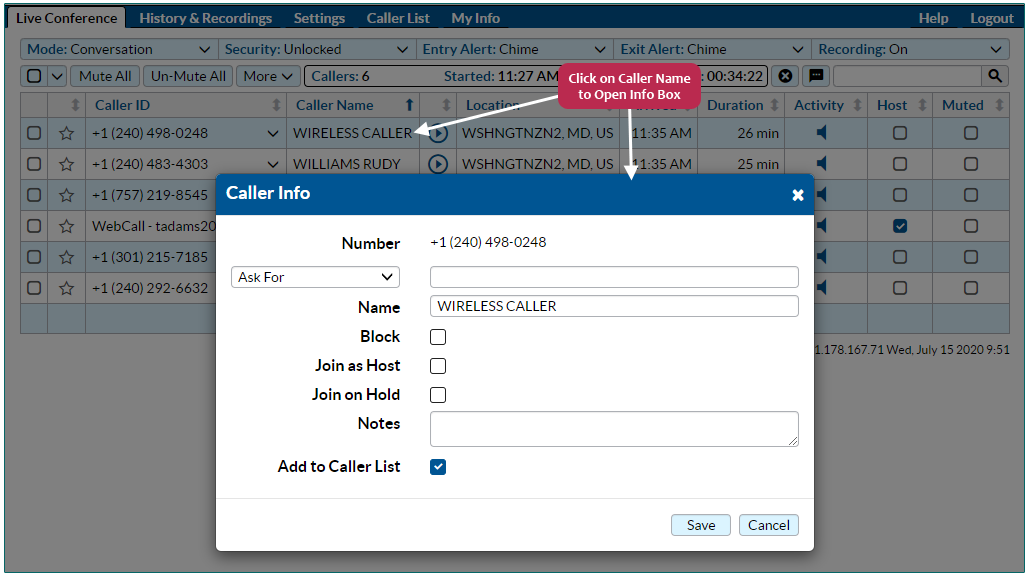
The Caller List entry also allows you to apply automatic actions to the caller when joining your conferences:
- Block – This prevents the caller from joining future conference calls from this phone number. (This doesn't prevent them from joining if they block their Caller ID or call from a different phone.) Blocked callers will hear an announcement that “the Conference ID you entered is temporarily unavailable.”
- Join as Host – The caller will automatically be designated as a Host when arriving in the conference. (This means that the caller will not need to enter the Host PIN. This setting can be used to give speaking and keypad command privileges to certain participants without requiring you to disclose the Host PIN – this allows you to delegate hosting responsibilities without allowing those individuals to log into your online account.) Automatic hosts will hear an announcement (“You are a host.”) when they arrive.
- Join on Hold – If this box is checked, the caller will be placed on hold when joining your conference calls, and they will remain on hold until you proactively take them off hold using the Host Control Panel. You can take an individual caller off hold by clicking on their Caller ID number in the Live Conference tab, and choosing the “Take Off Hold” option.
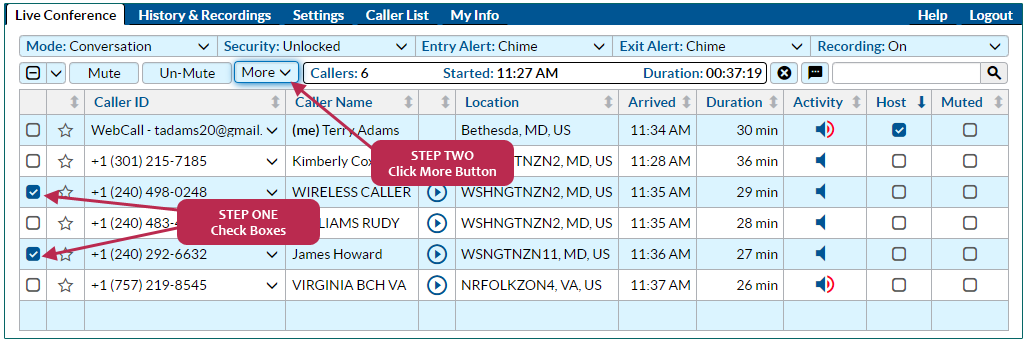
Simultaneously Apply Actions to Multiple Callers
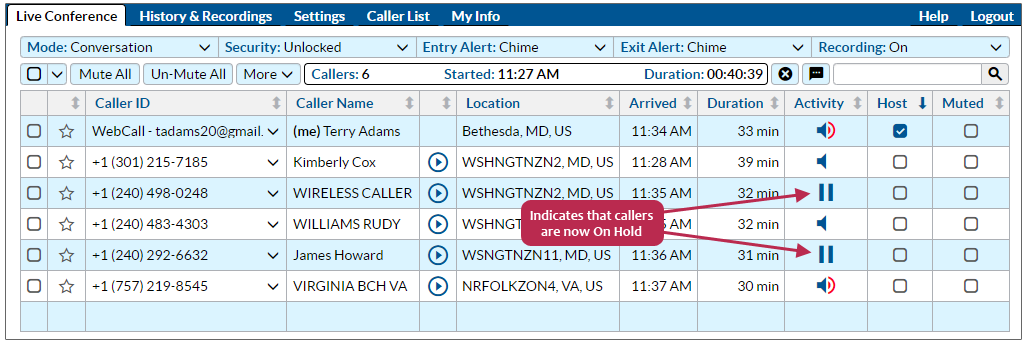
You can use the first column to select multiple callers and simultaneously apply an action to the selected participants. For example, you can select some of the participants and temporarily place them on hold, while the remaining participants engage in a private conversation. Click on one or more of the checkboxes in the left column, then click on the More button to choose the action to apply to the selected callers. In the example below, the host first checks the boxes associated with two of the callers, and will then click on the More button.
Clicking on the More button brings up the list of possible actions to apply to the selected callers:
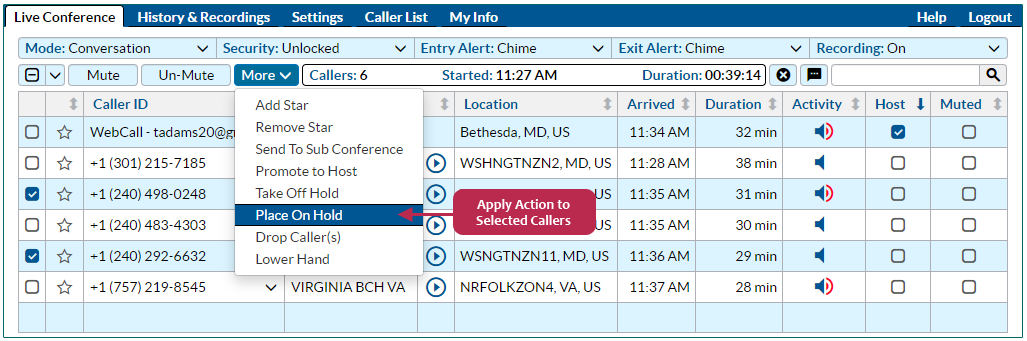
After applying the Place On Hold action, the Activity column indicates that the two callers are now on hold, and unable to hear those remaining in the conference.
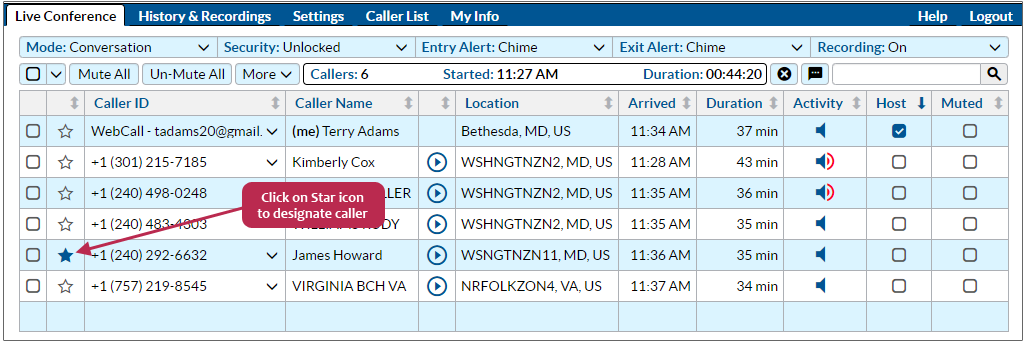
Using the Star Column
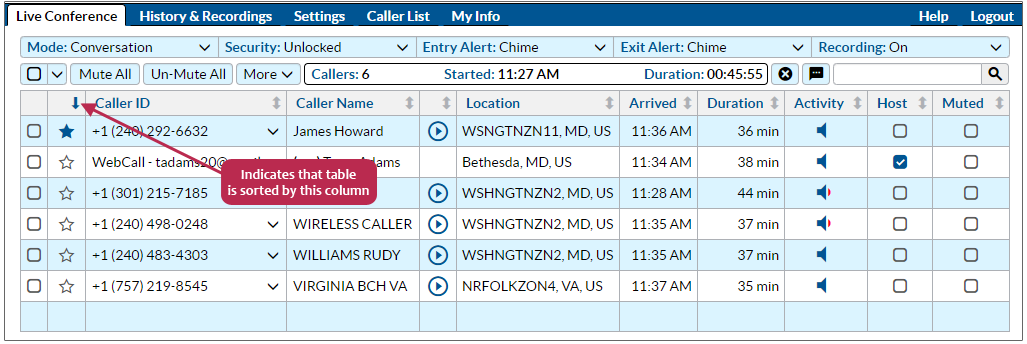
You can “flag” a participant by clicking the corresponding star icon in the second column. This allows you to keep track of certain callers during a conference, which could be important guests. If you sort the callers by that column, the starred participants will persistently be listed at the top of the caller list display, so you can monitor when that caller is speaking or leaves the conference.
After clicking on star column header, the starred participants move to the top of the caller list, as shown below.
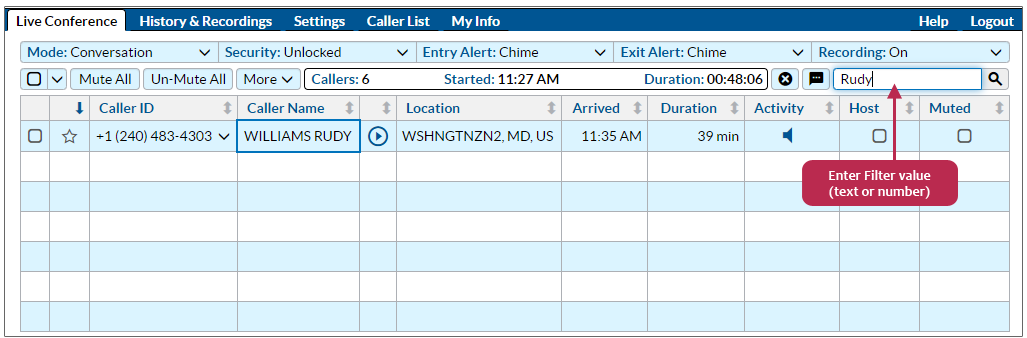
Filtering the Caller Display
You can place a value in the Filter box near the top right corner of the Live Conference display, which will remove all callers from the display which do not match the filter criteria. You can match any portion of the Caller ID (e.g., callers in a certain area code), Caller Name, or Location (e.g., callers from a certain city). The filter does not affect the status of the callers in the conference, but allows you to quickly find particular callers when you have many participants in the conference.
Managing a Question & Answer Session with the “Raise Your Hand” Feature
In conjunction with the *5 Raise Your Hand keypad command, you can use the Host Control Panel to fully manage a question and answer session during a large conference call, allowing you to un-mute callers one at a time to ask their questions in an orderly manner. For a complete description, see Managing a Question & Answer Session.
Other Actions Using the Live Conference Panel
Three icon buttons are displayed above the participant table:
- End Conference – This disconnects all participants and immediately terminates the conference. You will be prompted to confirm the action if you click on this button.
- Add Reference Label – You can specify any alphanumeric label associated with the active conference call. This label is contained in email post-conference report, the conference listing in the History & Recordings tab, and downloadable conference records. It could be a description or purpose of the call, project code, etc. This label can be subsequently edited via the History & Recordings tab.
Caller List
In addition to editing caller information for entries that were saved to the Caller List through the Live Conference panel, you can add caller entries in advance of your conference calls via this tab.
You may also populate the Caller List using the History & Recordings tab. Click on the spyglass icon to view the details for a particular conference, then click on the Name associated with a particular caller to save that entry to the Caller List.
